HOME
Consulting Services
Management ConsultingProduct Development
System Implementation
Wireless Site Surveys
Troubleshooting
Training
Expert Witness
What's New
Technical Resources
NewsletterBooks
Tutorials
Industry News
Quick Tips
Links
About Us
ConsultantsTechnology Focus
Industries Served
Our Clients
Client Testimonials
Contact Us
Follow Us:
How to: Assign 802.11b/g Access Point Channels
by
Jim Geier
Back to Tutorials
After completing a RF site survey, you’ll have a good idea of the number and location of access points to provide adequate coverage and performance for users. Before installing the access points, however, be sure to determine what RF channels you plan to use. This will ensure that users will be able to roam throughout the facility and have the performance that they need.
802.11b/g RF channel basics
Direct communication between an 802.11 client radio and an access point occurs over a common channel frequency. You set the channel in the access point, and the radio card automatically tunes its transceiver to the frequency of the access point having the strongest signal. The radio card then continues with association and communications with the chosen access point.
To support roaming, the client radio periodically scans all access points and associates with the access point having the strongest signal (if the current access point signal amplitude is below a specific threshold). As a design rule, access points within range of each other should be set to channel frequencies with minimal signal overlap. Otherwise, you’ll find that roaming doesn’t work well, and performance will degrade because of interference between access points.
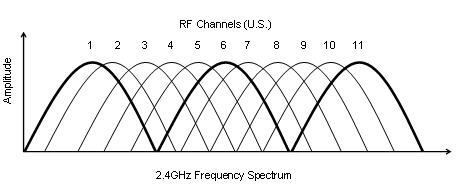
The 802.11b/g standards define a total of 14 frequency channels within the 2.4 GHz band. The FCC allows channels 1 through 11 within the U.S.; whereas, most of Europe can use channels 1 through 13. In Japan, all 14 channels are available. The total 2.4 GHz spectrum width is roughly 90 MHz.
An important concept to note regarding channel assignments is that the channel actually represents the center frequency that the transceiver within the client radio and access point uses (e.g., 2.412 GHz for channel 1 and 2.417 GHz for channel 2). There is only 5 MHz separation between the center frequencies, and an 802.11b signal occupies approximately 30 MHz of the frequency spectrum. The signal falls within about 15 MHz on each side of the center frequency. Consequently, an 802.11b/g signal overlaps with several adjacent channel frequencies. This leaves you with only three channels (channels 1, 6, and 11 for the U.S.) available for use without causing interference between access points (see figure below).
In terms of throughput, there's not much of a problem with access points set to the same channel if the load on the network is light. The addition of beacon broadcasts from multiple access points with common channel settings has insignificant impact on performance. Nevertheless, keep in mind that having the access points set to the same channel will sometimes confuse client radios, which leads to roaming problems. In addition, setting access points near each other to the same channel will degrade capacity, and performance will be significantly lower as traffic on the network increases. As a result, it’s best to assign non-overlapping channels to nearby access points.
Some tips to ponder
To effectively assign access point channels, start by properly planning the optimum installation location for each access point. It’s important to have enough access points to provide adequate signal coverage throughout the facility, but don’t overdo it. Make sure that access points are far enough apart so that you’ll be able to assign non-overlapping channels (i.e., 1, 6, and 11 in the U.S.) to access points that are within range of each other. As a result, it’s crucial to perform a RF site survey before assigning access point channels.
Your life will be easy with smaller networks. For wireless LANs with a single access point, such as with home and small office networks, you can theoretically set the access point to any one of the channels. My company has completed widespread scans of large municipalities, such as San Francisco and Denver, and found that approximately 75 percent of 802.11b/g access points are set to channel 6, a common default channel. Thus, to avoid interference with neighboring networks, set your access point to either channel 1 or 11. If there are two or three access points, assign any combination of channels 1, 6, and 11, but try to avoid channel 6 near walls of the facility to minimize interference with neighboring networks.
For wireless LANs having greater than three access points, do some up-front planning. With single floor facilities, the access points will be spread relatively far apart, making channel assignment relatively straightforward. You can easily use a drawing to identify the position of your access points in relation to each other and assign each access point a channel. The key with larger networks is to make certain channels are assigned in a way that minimizes the overlap of signals. Just ensure that all access points within range of each other, about 300 feet or so apart, are set to channels that don’t overlap (i.e., 1, 6 and 11). It will likely not be possible to result in absolutely no overlap in channel usage, but keeping the channel re-use as far apart as possible will improve overall capacity of the network and resulting performance.
If access points will be located on multiple floors, then you’ll have the more difficult task of thinking three-dimensionally. You can approach this problem the same way as the single floor application, but take into consideration access points on adjacent floors. Radio waves generally go through at least a single floor, which means that access points located near each other on different floors may need to be set to non-overlapping channels also. Before assigning channels in this fashion, however, do some inter-floor signal propagation testing to gauge the attenuation of the floors. In some (very few) cases, the floors may significantly attenuate the signals, making it not necessary to assign non-overlapping channels to access points on adjacent floors.
Some enterprise access points have optional mechanisms (often referred to as adaptive mode) that automatically change the RF channel in access points based on the current radio activity at each access point location. It makes sense to activate this feature in a highly dynamic environment, especially in congested areas such as cities. Neighboring wireless LANs and sources of RF interference come and go frequently in different parts of the 2.4 GHz spectrum. The setting of static channels may not be the best idea for these areas.
Keep in mind, however, that this automatic channel setting feature can disrupt voice communications over Wi-Fi networks. The changing of the RF channel forces the associated client radios to effectively handoff (i.e., roam) to the new RF channel. As a result, an access point that decides to change channels causes substantial latency due to the roaming, which generally drops all voice calls going through that access point.
If your wireless LAN seems to have poor performance when a microwave oven is operating, then try setting the access point nearest to the microwave oven to a different channel. My consulting company has tested the impacts of many microwave ovens on 2.4 GHz wireless LANs and has found that the majority of microwave ovens affect the upper third of the 2.4 GHz spectrum (see my previous tutorial on microwave oven testing). As a result, setting the access point closest to the microwave oven to channel 1 avoids nearly all interference generated by the oven. Keep that in mind when assigning channels to access points.
Don't be afraid to experiment a bit with RF channel settings. Try different configurations, and compare the resulting performance. You'll quickly find the optimum settings that work best for your environment.
Questions? <<Contact the Author>>
Back to Tutorials